Fuel Carrier Return Filing Instructions
Filing Requirements, Rules, & Options
Filing Requirements: A Fuel Carrier Return must be filed monthly. Returns are due monthly on the 26th day of the month following the activity or the next business day if the 26th is on a weekend or holiday. If a return is submitted after the due date, a penalty of $100 will be charged, and you will receive a statement by mail. Visit the Fuel Tax Filing Information or review the Fuel Tax Guide for more information.
Fuel Tax Return Rules: There are checks built into Revenue Online to help catch errors and invalid transactions before the return is submitted. Download the Reporting Rules for Carriers.
Filing Options: Carriers have 3 filing options:
- XML
- Spreadsheet
- Web Entry
If using XML or a spreadsheet, use the appropriate template.
Step-by-Step Filing Instructions
Step 1: Gather All Shipping Documents for the Month
Determine whether the shipment was in state or delivered or hauled from another state or province. This will be used to determine the schedule.
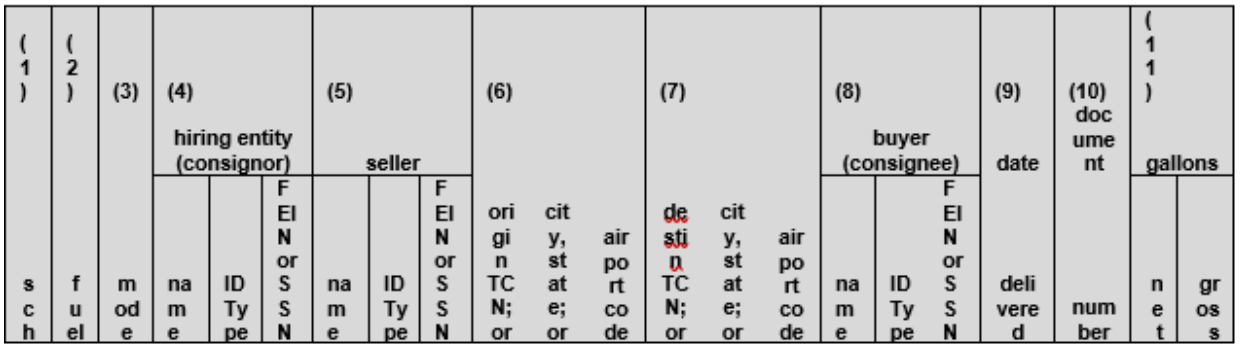
This will include all imports, exports, and in-state transactions for the period. Each record should contain a Schedule (1A, 2A, or 3A), Fuel Type, Hiring Entity Name, Hiring Entity ID Type, Hiring Entity ID, Seller Name, Seller ID Type, Seller ID, Transportation Mode, Origin Terminal or City, State, Destination Terminal or City, State, Buyer Name, Buyer ID Type, Buyer ID, Date Received, Doc Number, Net Gallons, Gross Gallons.
Step 2: Complete this Step if Filing by Spreadsheet
Go to the Fuel Tax Spreadsheet Filing web page to access the current version of the Fuel Carrier Revenue Online Spreadsheet.
Then enter the required information for each fuel transaction
- Sch - Enter the schedule for the activity being reported.
- Schedule 1A to report fuel delivered to another state or province.
- Schedule 2A to report fuel hauled from another state or province.
- Schedule 3A to report fuel received and delivered in Colorado.
- Fuel - Enter valid fuel type (code).
- Mode - Enter the mode - usually (J) by truck or (R) if by train car.
- Hiring Entity (consignor) - Enter name, ID Type (either SSN or FEIN) and their ID. IDs may have any of the following formats: xx-xxxxxx, xxx-xx-xxxx, and xxxxxxxx.
- Seller - Enter the seller’s name, ID Type (either SSN or FEIN), and their ID. IDs may have any of the following formats xx-xxxxxx, xxx-xx-xxxx, and xxxxxxxx
- Origin - Enter the point of origin. Complete one of the three origin columns per record.
- Origin TCN - Valid TCN id, for example, T-84-CO-4100
- Origin City, State
- Origin Airport Code
- Destination - Enter the point of destination. Complete one of the three destination columns per record.
- Destin. TCN - Valid TCN id, for example, T-84-CO-4100
- Destination City, State
- Destination Airport Code - Enter a valid airport code.
- Note: Each transaction must have an Origin and a Destination.
- Buyer (consignee) - Enter the buyer of the fuel. Enter the Buyer’s name, ID Type (either SSN or FEIN), and their ID. IDs may have any of the following formats xx-xxxxxx, xxx-xx-xxxx, and xxxxxxxx.
- Date Delivered - Enter the date of the transaction, this must be for the current period.
- Document Number - Enter the bill of lading or the manifest number of the transaction.
- Gallons -
- If importing or exporting: net and gross gallons are required.
- If reporting in-state transactions, gross gallons are required for all fuel types, except propane (054), net gallons are required for propane.
- Once all activity has been recorded, save the spreadsheet to a location on your computer that you will be able to access. The spreadsheet is now ready to be uploaded into Revenue Online.
Step 3: Complete This Step if Filing by XML
Go to the XML Information web page to access the current version of the Fuel Tax Revenue Online Schema. Prepare the XML schema using a pre-formatted XML Schema, based on the guidelines listed with the schema.
Step 4: File Using Revenue Online
Log into your Revenue Online account and click on “File Return” under your Fuel Information Reporting account. You can also click on “File/Amend and View Returns/Payments to file a return for a previous period. To file a new return, click “File Now” for the period end date. To amend a previously filed return, click on “View or Amend Return” for the period end date, then choose “Amend” from the options at the top.

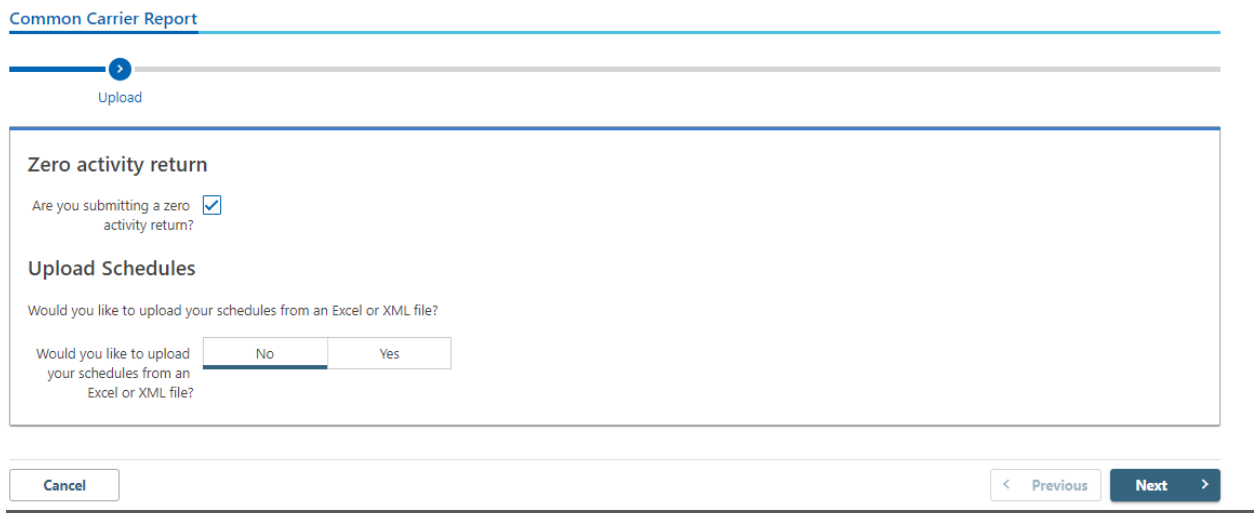
Zero Returns
If you are filing a no activity (zero) return, verify “No” is selected for the, “Would you like to upload your schedules from an Excel or XML file? Question. Click on the box next to the, “Are you submitting a zero activity return?” question. Then click the “Next” button until you arrive at the “ Summary” page and then click “Submit”.
You will receive a confirmation number on your screen after the return is submitted. With the option to print the confirmation page, and the return.
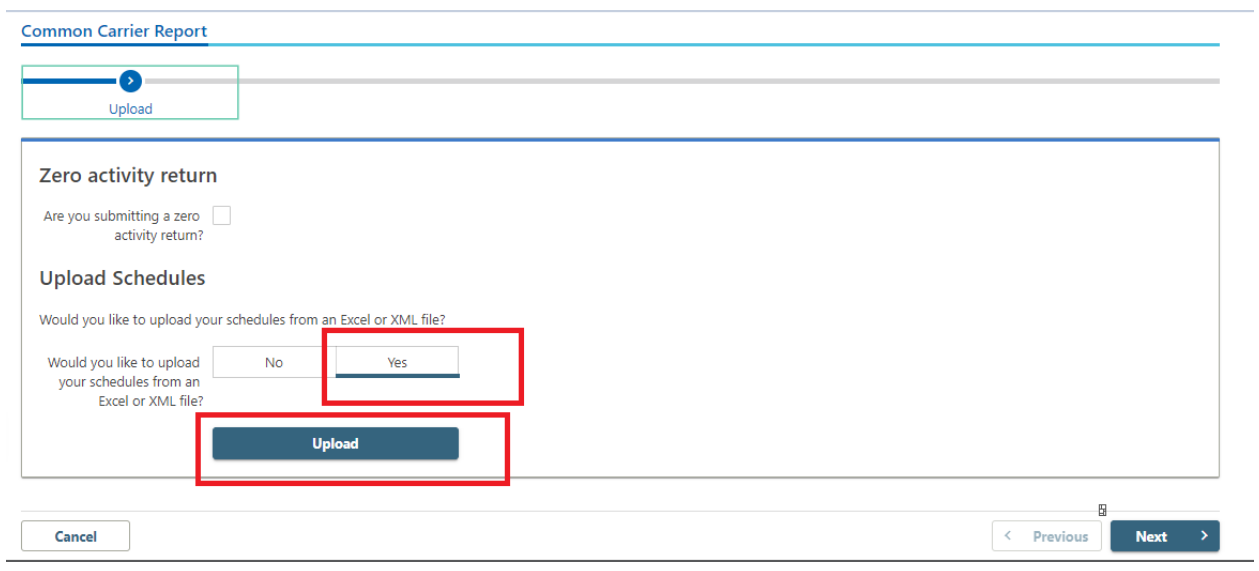
Step 5: Schedule Upload (Spreadsheet & XML Filers)
Step 5 - Part 1: If you are filing using a completed spreadsheet or XML file. Click on the Yes box and then click on Upload.
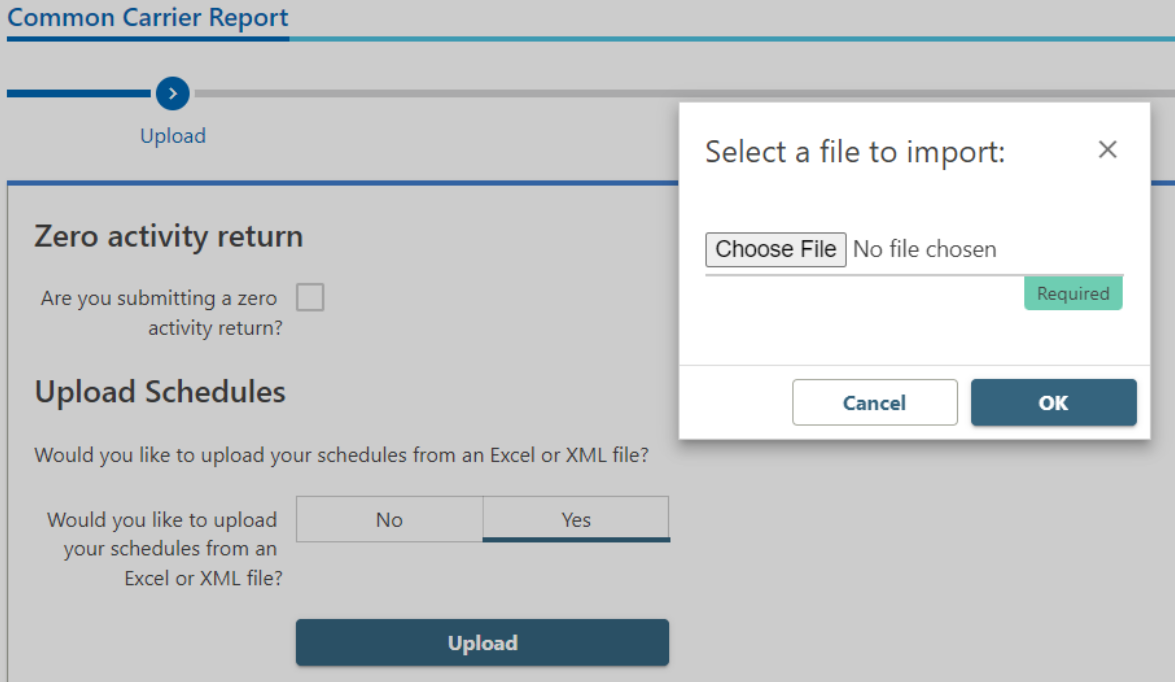
Step 5 - Part 2: A popup will appear over the screen; Click on Choose File, and find the correct file from your computer, after choosing a file click on OK.
Note: If the chosen file doesn’t match the expected format, the error “Unsupported file format” will display. You will have to resolve the error prior to going any further.
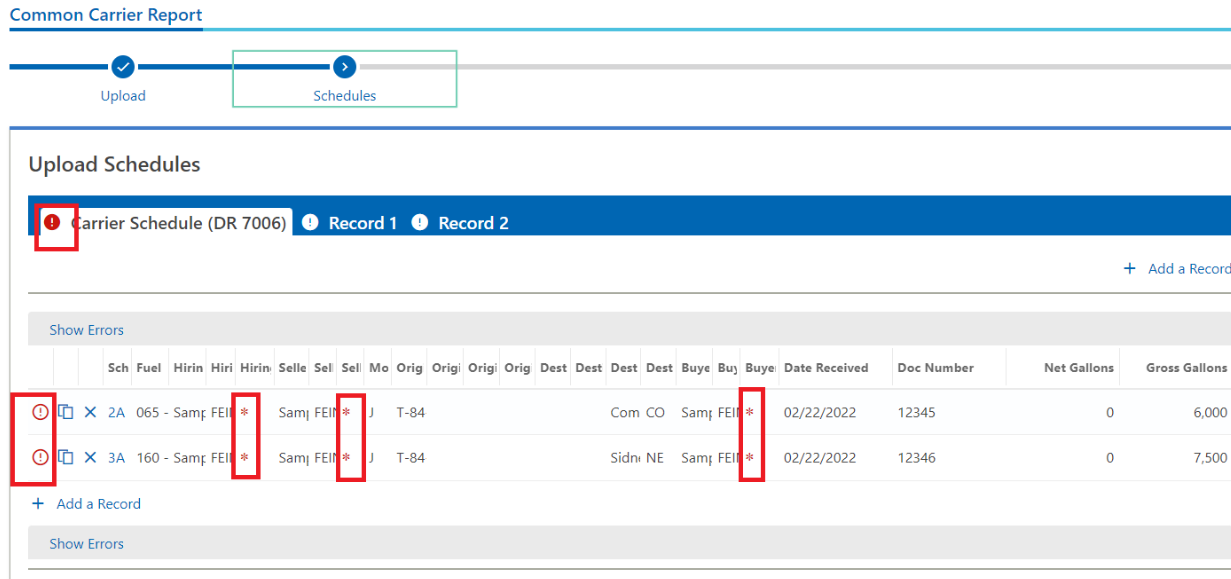
Step 5 - Part 3: Once the file has uploaded, click on Next to go to the next tab, “Schedules”. If there are any issues found, the form number will have a Red Circle with an Exclamation mark inside of it to notify you of issues.
Each row that has a red circle with an exclamation mark on the far left will need to be corrected. For example, the first row has the indicator on the far left and a different one by the Carrier ID. This indicates the carrier id is not complete.
You may correct the errors by entering the correct information directly into Revenue Online, or by correcting them on the file and re-uploading the file. After all records in the Schedule tab are corrected, select Next.
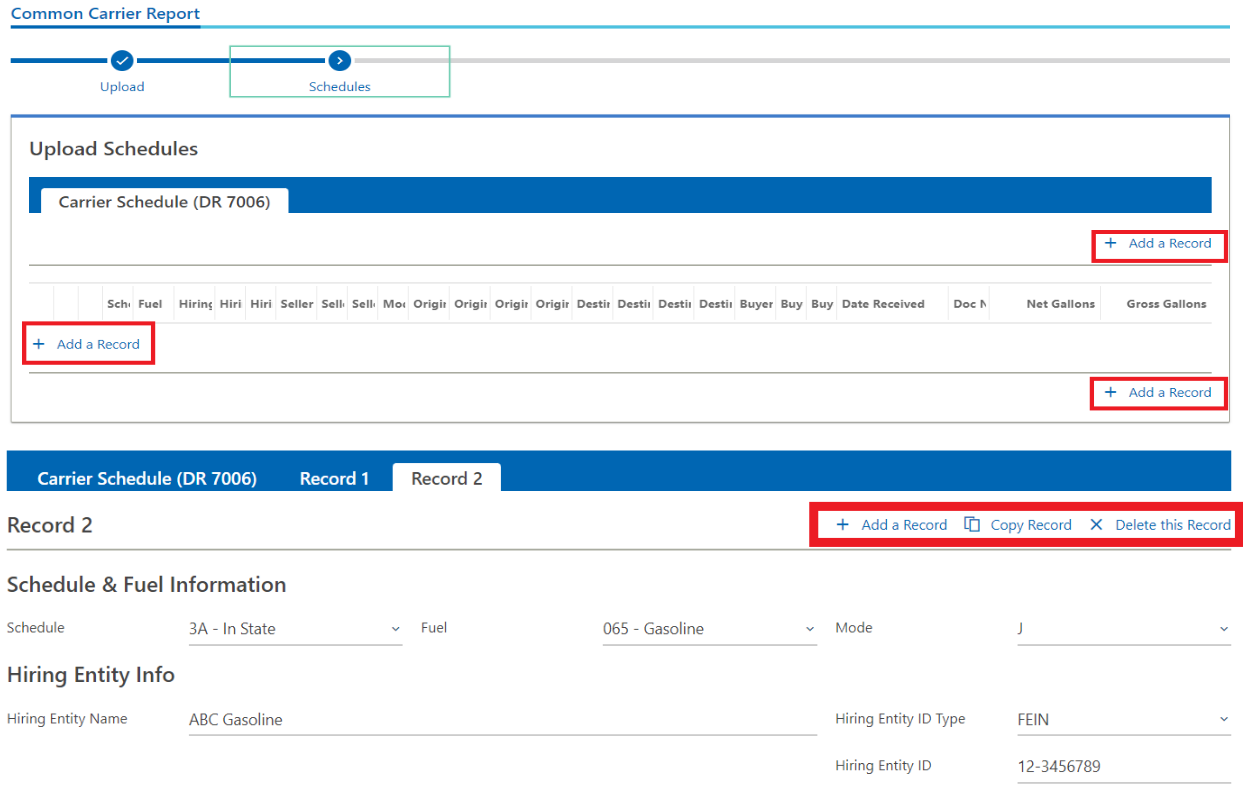
Step 6: How To Add Transactions by Web Entry
On the Schedules tab, click on “Add a Schedule”, or “New Schedule” if records already exist. Complete the screen for the first transaction. The transactions are on the same tab (DR7050). They can be input in any order, whether they are receipts or disbursements. The next page labeled “Return Schedule Summary” will summarize them based on the schedules reported.
- To report additional transactions, you can select Copy Schedule, and Revenue Online will autofill the previous entry, then you can adjust it for your next transaction.
- To complete an entirely different transaction, select New Schedule. Then select “Next” when you have recorded all transactions for all receipts and disbursements.
- If you added an extra record, you can select Delete Schedule to remove it.
- See Step 2 for details on completing each record.
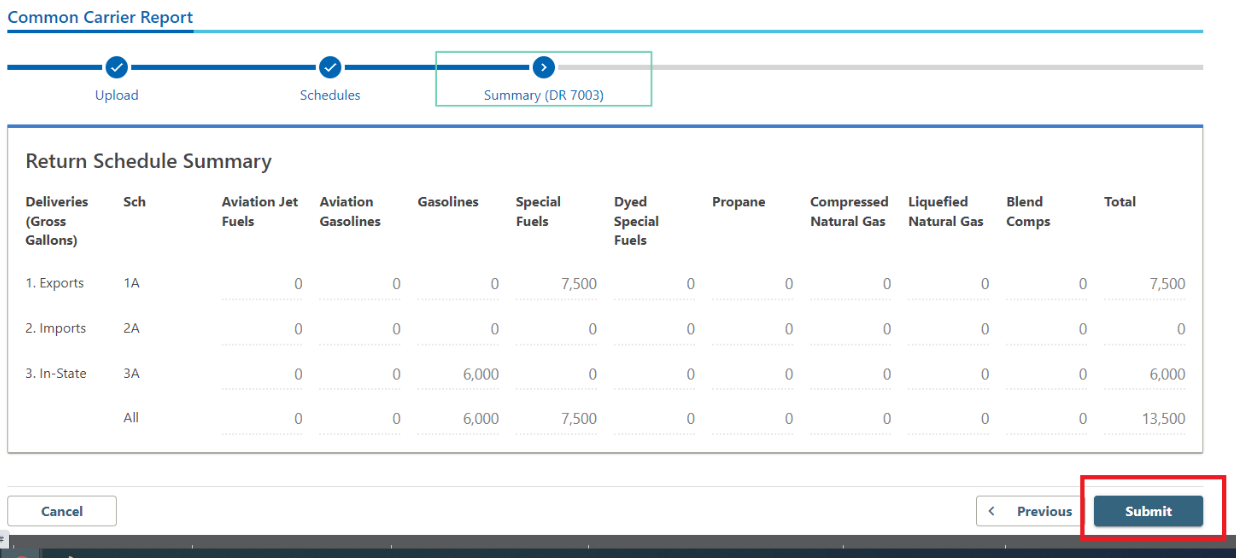
Step 7: Return Schedule Summary (DR 7003)
This tab summarizes the total activity for the period.
Step 8: Confirmation Page
A confirmation page will be displayed and can be printed as proof of filing. To print a copy of the summary pages, return to the period and select print.

And you’re done filing your Fuel Carrier Tax Return!