Year-End W-2 XLSX Info Return Template Instructions
W-2 XLSX Template
This template and submission option is for submitters of employers with 10 - 100 employees’ informational returns (W-2s) who are now required to file electronically for the 2023 tax year information (2024 reporting year).
To locate the template(s) for submission, go to the Withholding Forms web page and download either the W2 Info Return Template for Employer Submitters or the 1099 W2G Info Return Template for e-File Submitters.
W-2 Template
Step 1
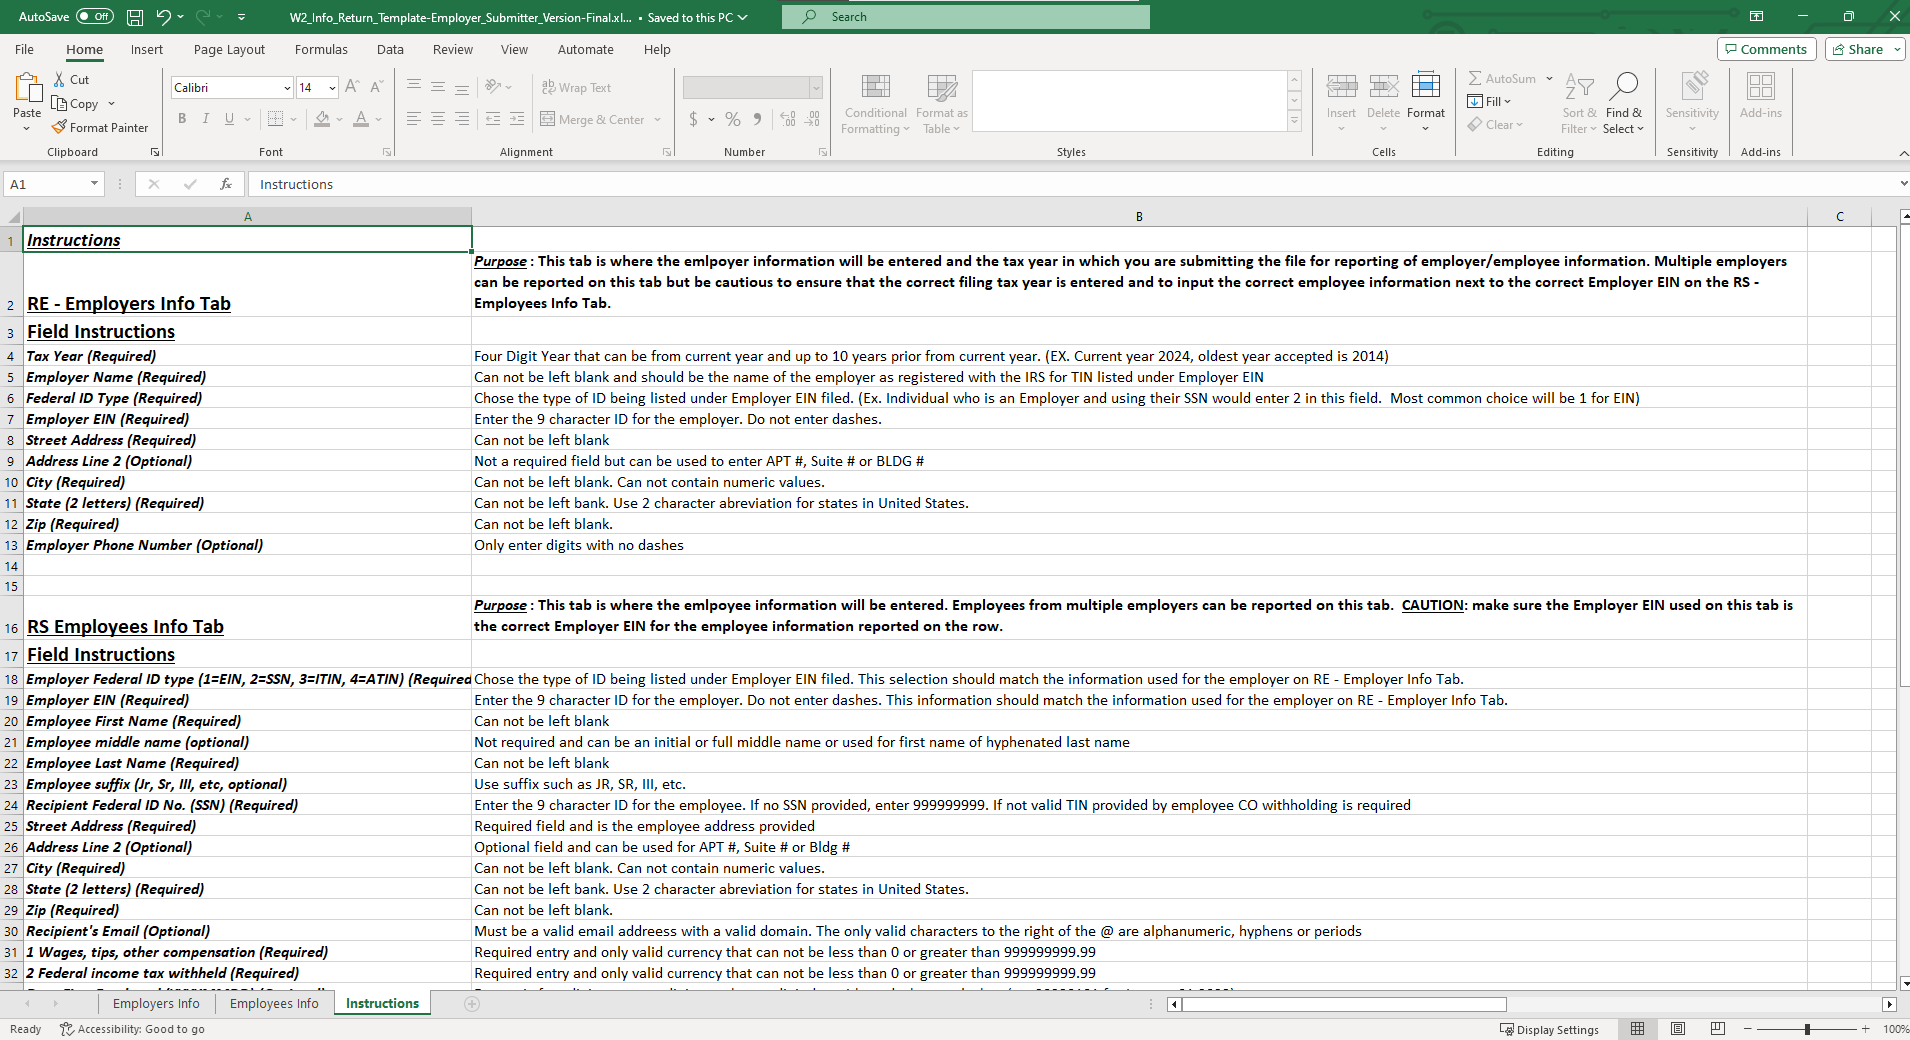
The W-2 template contains three tabs located at the bottom of the workbook and shown with a red box in the screenshot below: Employer Info, Employee Info, and Instructions.
Employer Information (Employer Info) tab: This tab is where you will enter the tax year in which you report W-2 information and the employer details found on the W-2 form.
NOTE: You can submit multiple employer's information for the same tax year but NOT multiple tax years for the same employer.
The required fields for this tab are:
- Tax Year
- Employer Name
- Federal ID Type
- Employer EIN
- Street Address
- City
- State (2 letters)
- Zip Code
Step 2
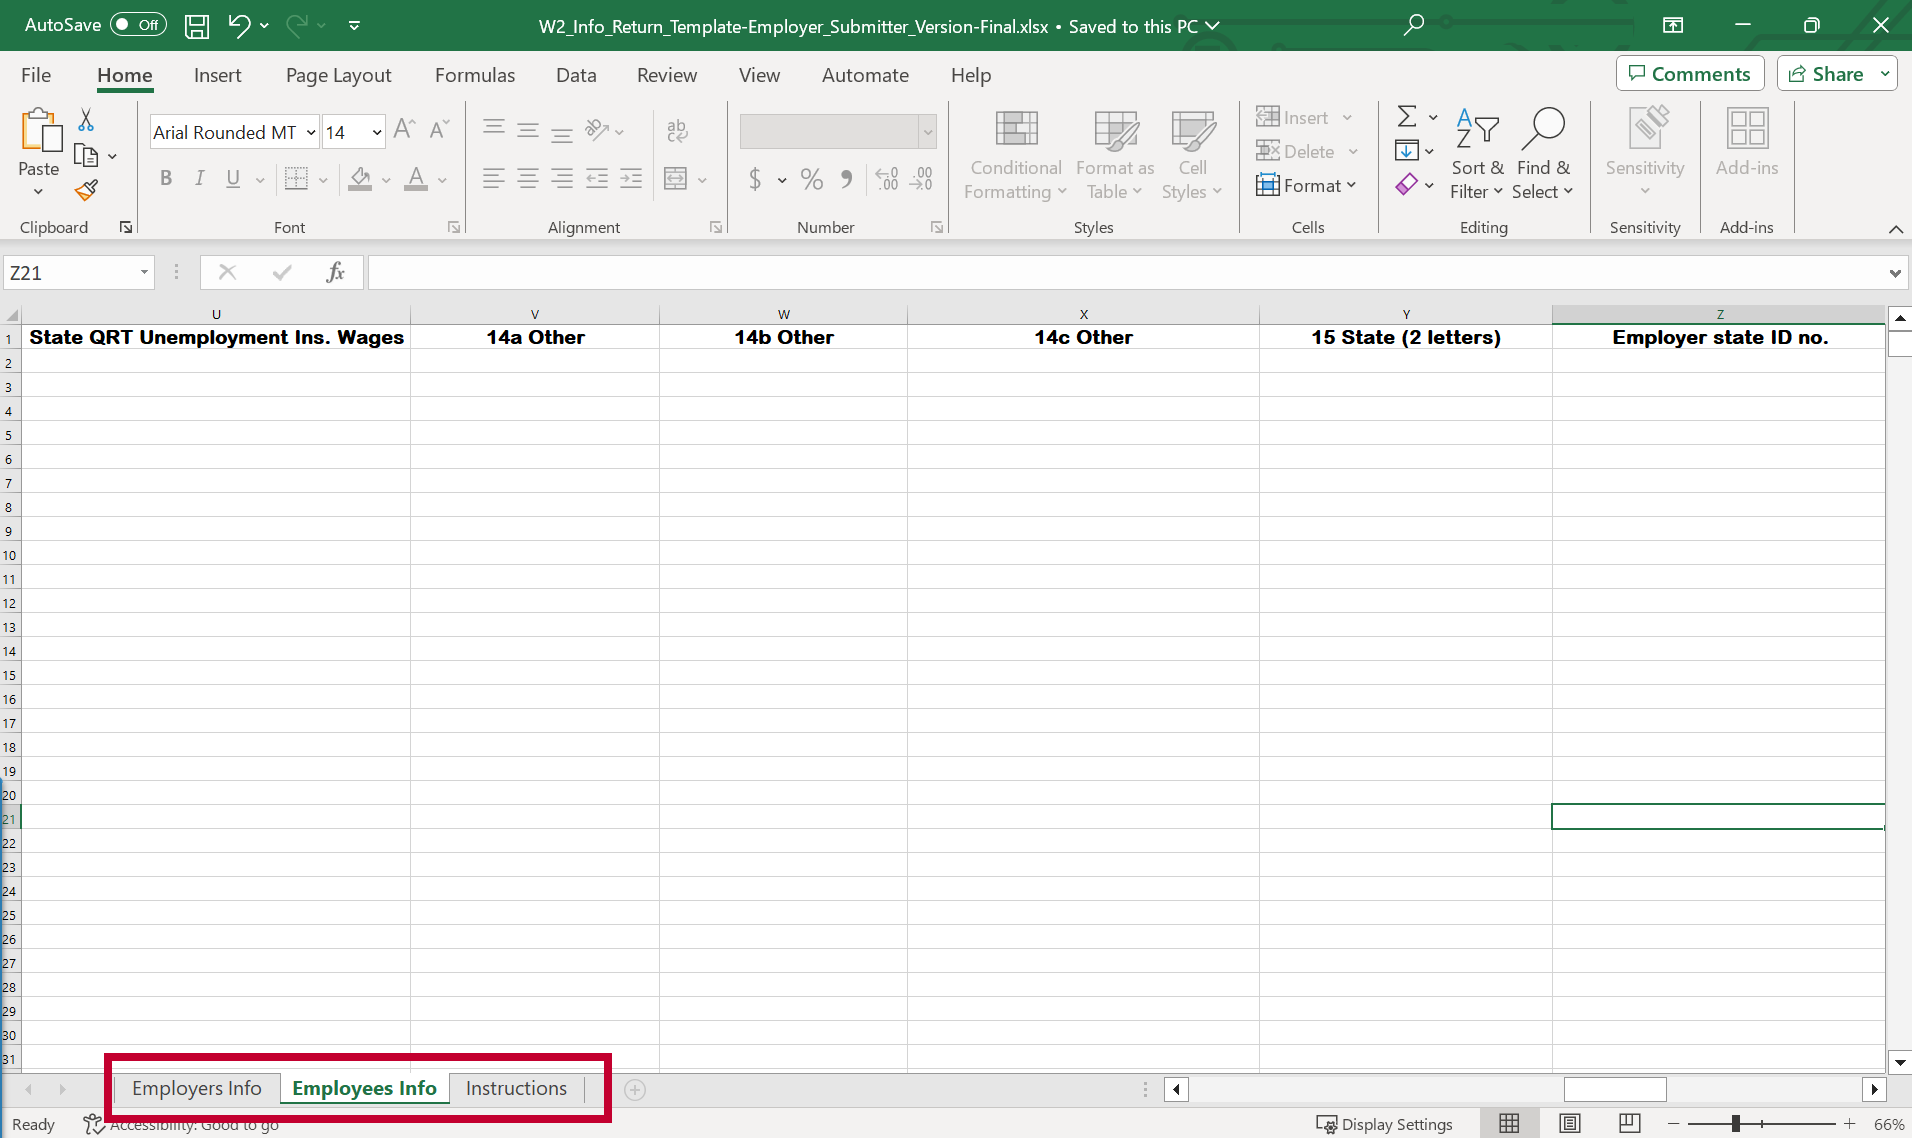
Employee Information (Employee Info) tab: This tab will contain the employee information on the W-2 form, such as Social Security Number (SSN), Address, Wages, and Withholding for Both Federal and State.
NOTE: You must also enter each employee's Employer EIN (Employer Identification Number) Type and ID Number on this tab. This is to link the information for the employee to the proper employer when submitting on behalf of multiple employers.
The required fields for this tab are:
- Employer Federal ID type (1=EIN (Employer Identification Number), 2=SSN (Social Security Number), 3=ITIN (Individual Taxpayer Identification Number), 4=ATIN (Adoption Taxpayer Identification Number))
- Employer EIN
- Employee First Name
- Employee Last Name
- Recipient Federal ID No. (SSN)
- Street Address
- City
- State (2 letters)
- Zip Code
- Wages, tips, other compensation (Box 1 from W-2)
- Federal income tax withheld (Box 2 from W-2)
- State (2 letters) (Box 15 from W-2)
- State wages, tips (Box 16 from W-2)
- State income tax (Box 17 from W-2)
Instructions tab: This tab provides details on which fields are required or optional as well as the validation rules for all fields on each tab so that the file will be accepted through Revenue Online.
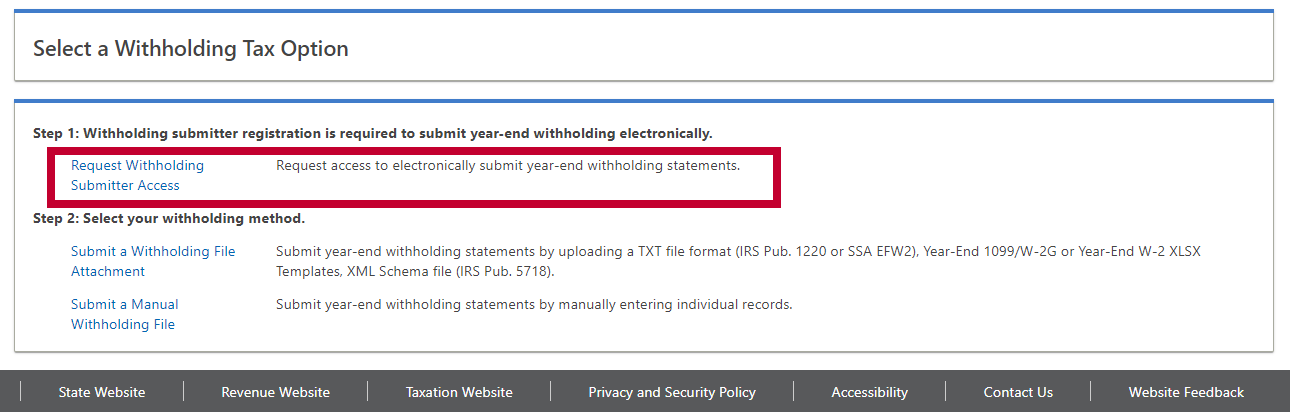
Request Withholding Submitter Access
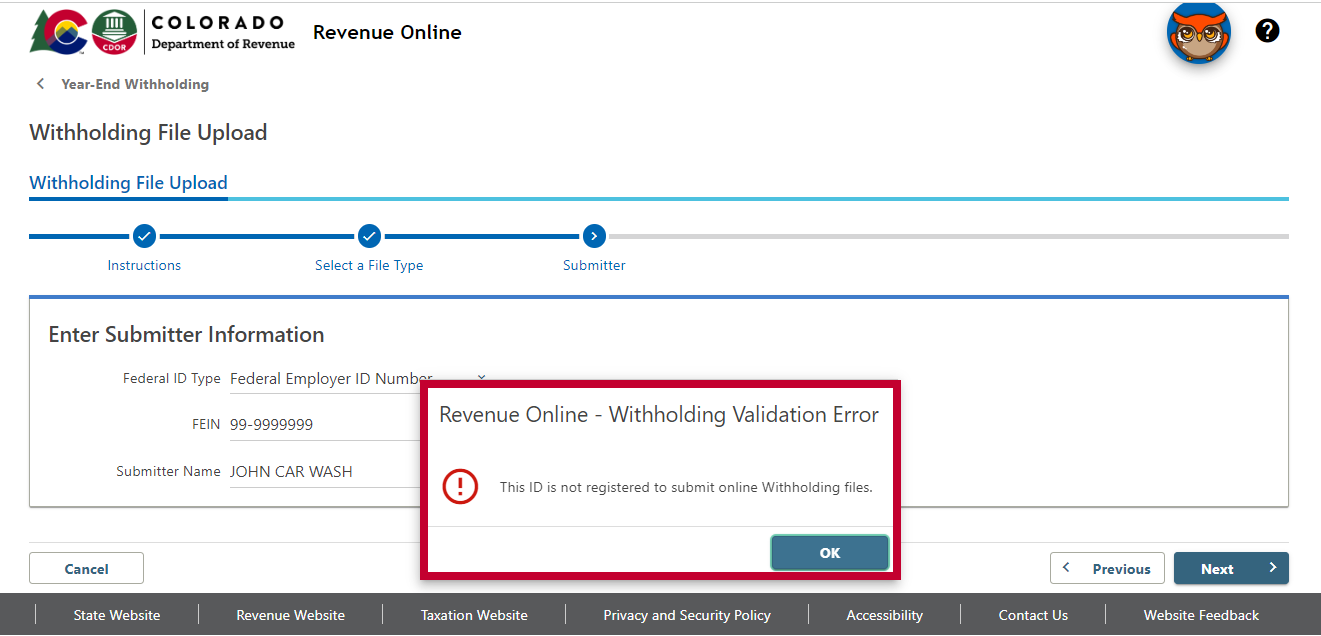
Before uploading year-end withholding informational returns with the Colorado Department of Revenue, you must first have Withholding Submitter Access. If you receive an error like the image below when attempting to upload your withholding file, you must request withholding submitter access.
Note: If you are a third-party submitter, you only need to request access under your name and federal ID number. Once granted access, you can submit on behalf of your clients using your Federal ID number and Name as the submitter. It is not necessary to request permission for your clients under their Name and Federal ID Number, and doing so is discouraged without their consent.
To request Withholding Submitter Access, click the link under Step 1, Request Withholding Submitter Access.
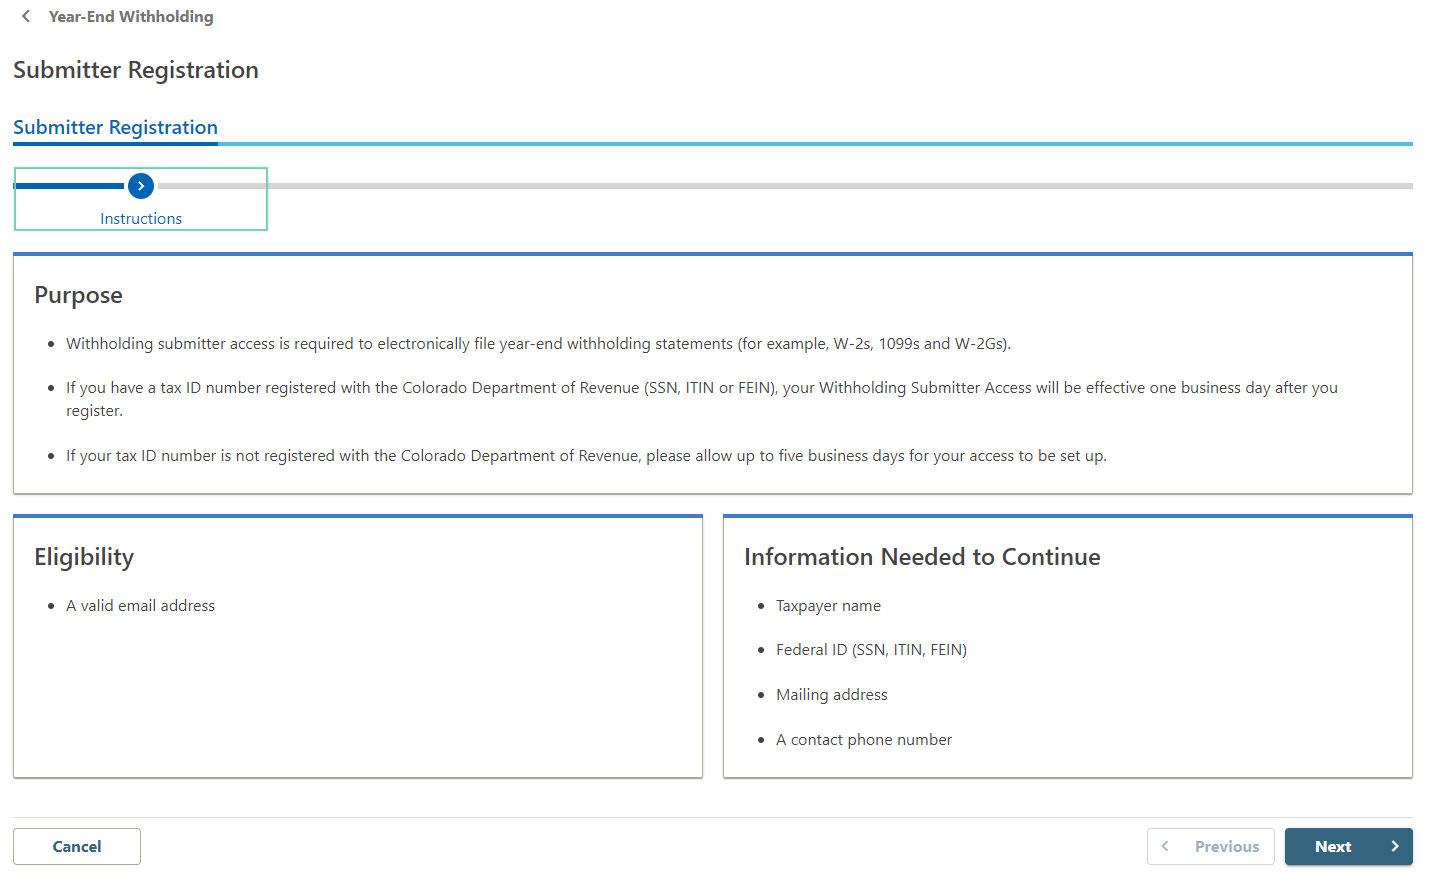
The next page will provide the purpose, eligibility requirements, and information needed to continue to request Withholding Submitter Access.
You will need the following information available to enter in your request:
- Taxpayer Name / Business Name
- Federal ID (SSN, ITIN, FEIN)
- Mailing Address
- A contact phone number
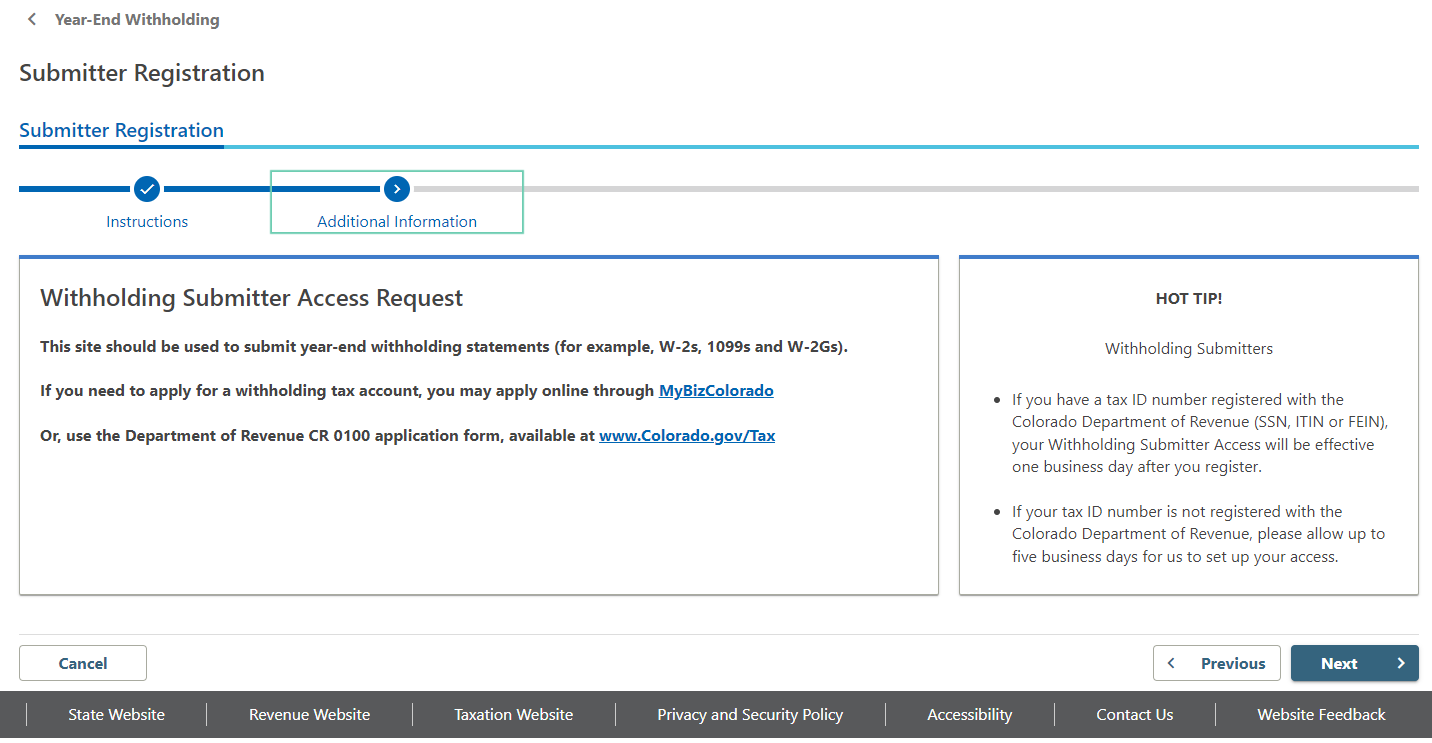
When you select “Next” at the bottom right of the page, you will be directed to the Additional Information page. After reading the information, select “Next” when you are ready to continue.
NOTE: While we strive to add withholding submitter access to your account in one business day after registering, this depends on validation through the IRS TIN (Taxpayer Identification Number) Matching Process. If your Name and Federal ID do not match exactly as issued by the IRS, this process will be delayed until the IRS 147c (Employer Identification Number Verification letter) can be verified to validate your Name and Federal ID.
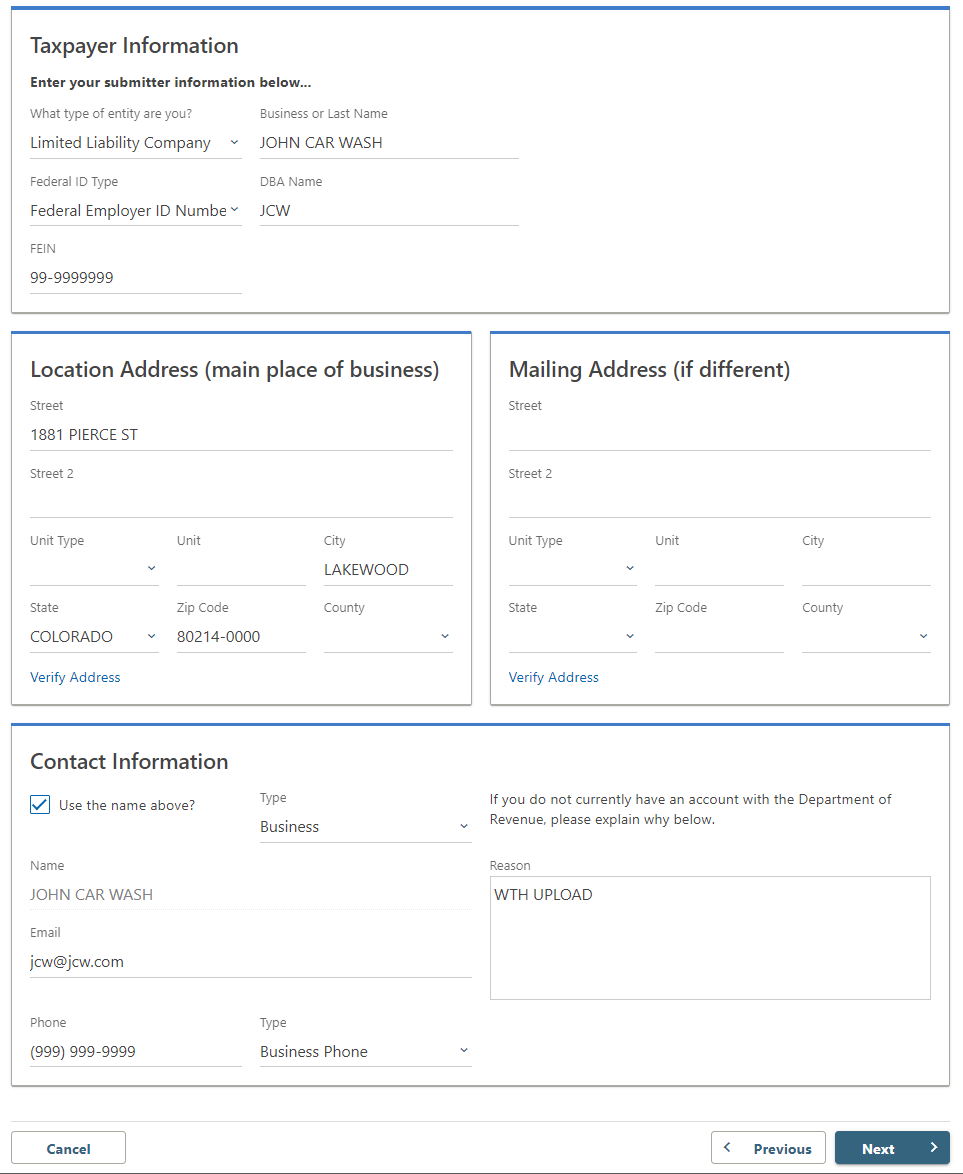
Enter your information in the appropriate fields. Once you have entered the required information into your request, select “Next” at the bottom right of the page.
You will then come to a confirmation screen to review the information you entered for accuracy. If your information is accurate and you agree with the terms and conditions listed on the page, select the checkbox next to “I agree to the above terms and conditions.” Then select “Submit” at the bottom right of the page to proceed.
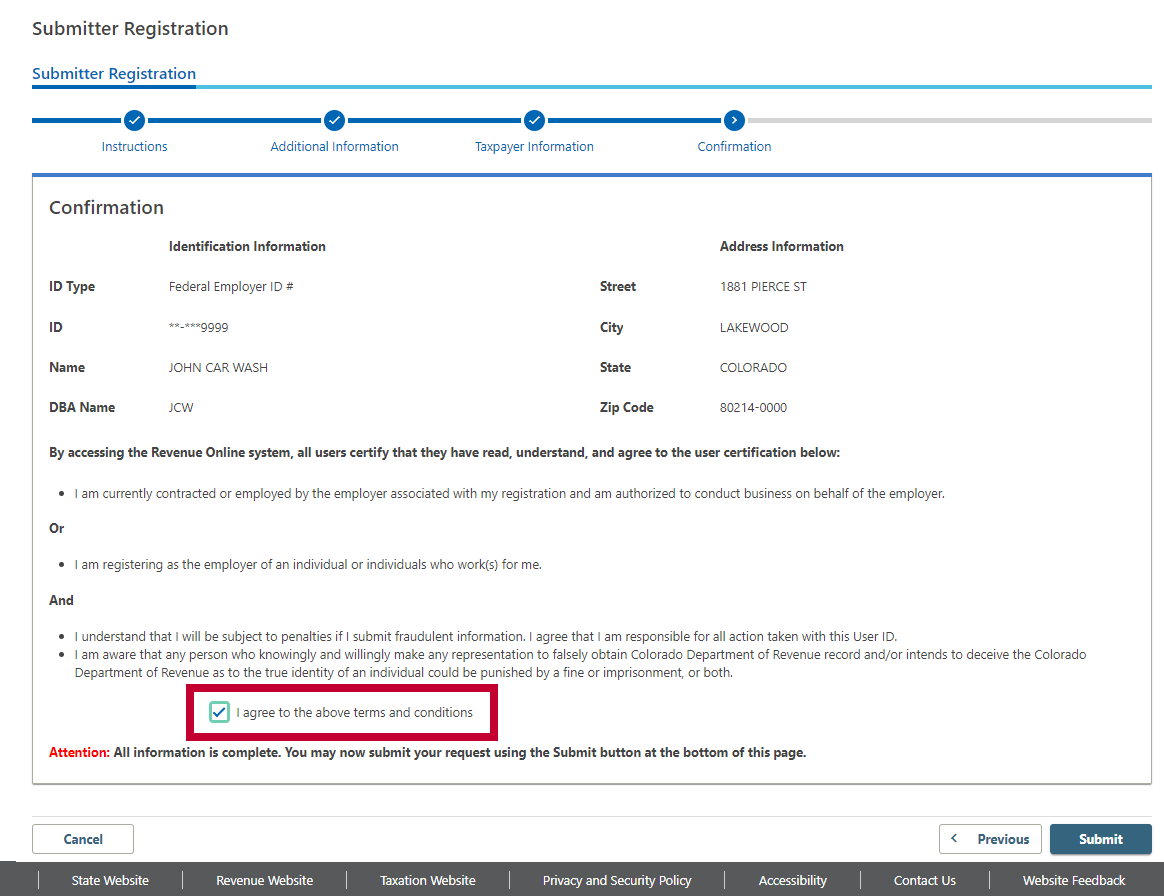
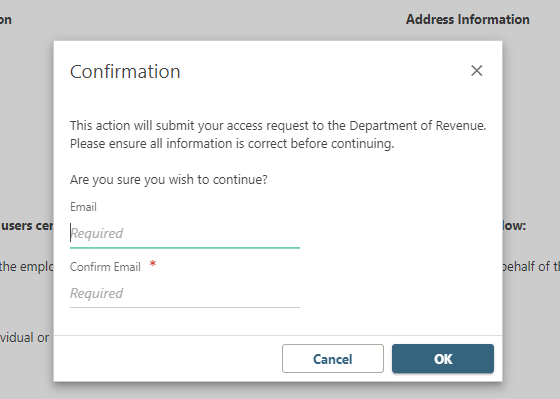
Next, you will receive a pop-up box to enter your email address and then to confirm your email address. Please type your email twice for accuracy.
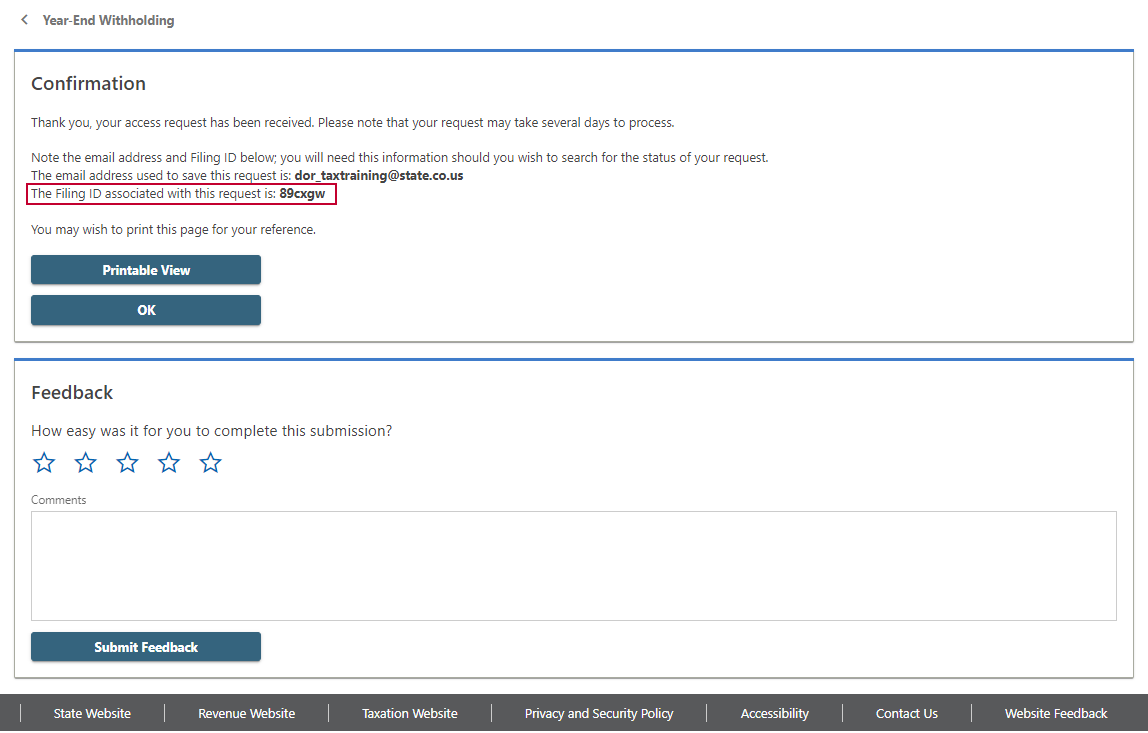
You will then receive a filing confirmation page (shown in the image below), which contains the email address you entered and a Filing ID for your request.
PLEASE SAVE THIS INFORMATION for your reference if you need to contact the Colorado Department of Revenue regarding this request.
(Please keep this information for your records).
Withholding File Upload on Revenue Online (Colorado Revenue Online)
Step 1:
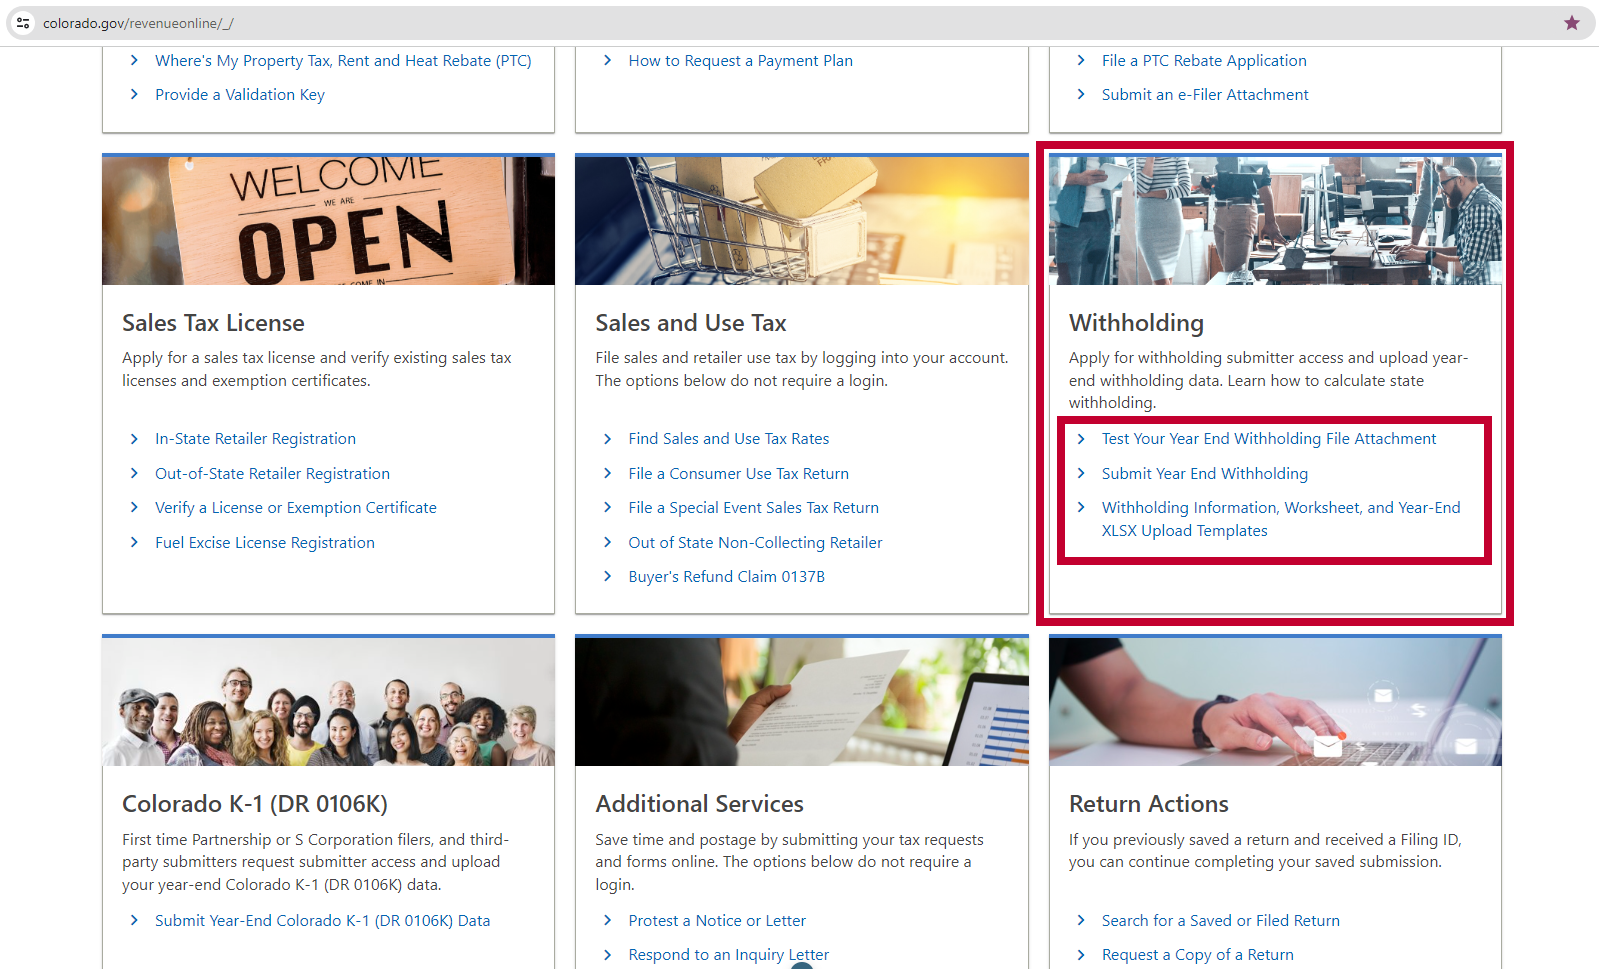
The Withholding menu panel contains three hyperlinks:
- Test Your Year-End Withholding File Attachment
- Submit Year-End Withholding
- Withholding Information, Worksheet, and Year-End XLSX Upload Templates.
The first link, “Test You Year-End Withholding File Attachment,” allows you to test the formatting of your withholding file. Please be advised that submitter access is required to perform this action. If the file shows no errors, the uploaded attachment is ready to submit, and you can then use the second link, “Submit Year-End Withholding,” to upload and submit your withholding file.
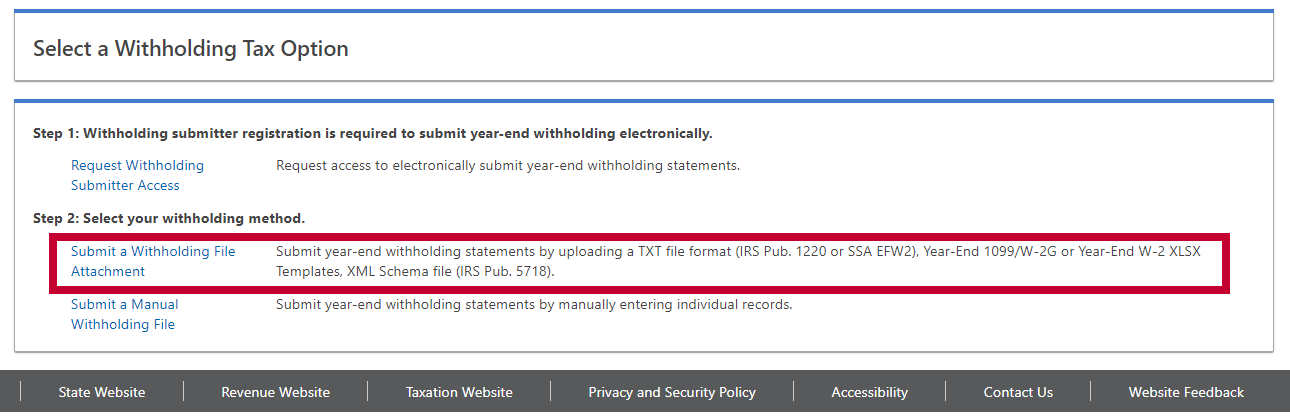
To upload a withholding file attachment, select the second hyperlink “Submit Year End Withholding.”
On the next page, select the hyperlink to “Submit a Withholding File Attachment,” which is shown in the red box in the screenshot below.
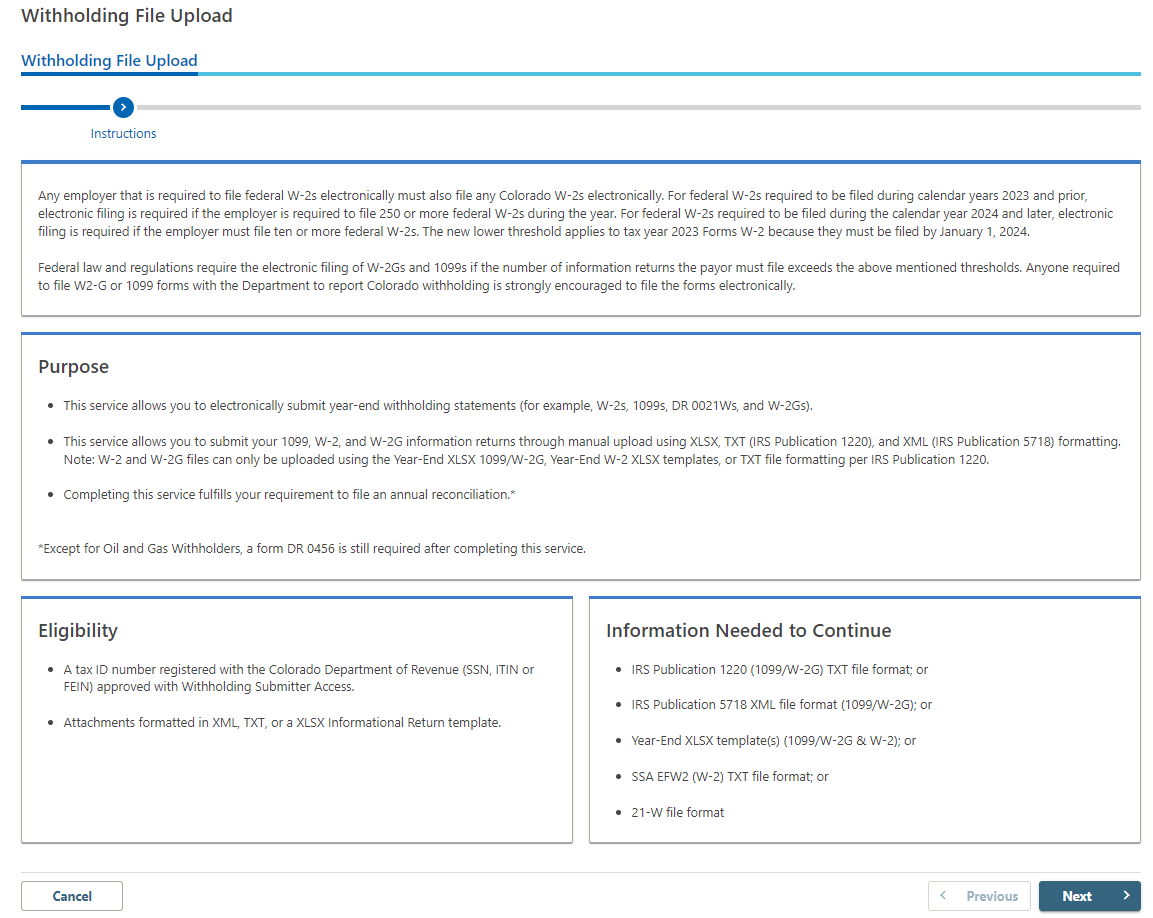
You will then be directed to the Instructions page which explains the purpose, eligibility, and information needed to continue the withholding file upload. Once you have read the information, select “Next” at the bottom right corner of the page.
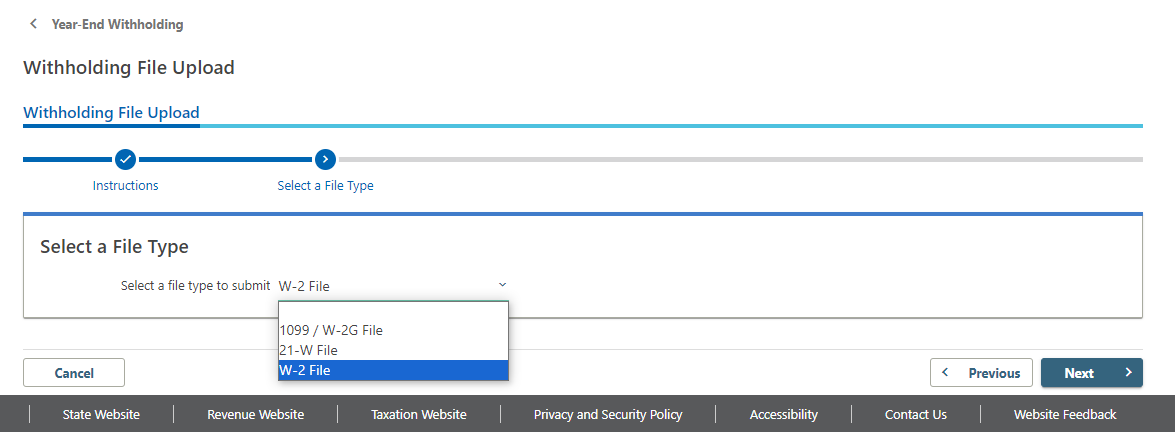
On the next page, you will select the file type to submit from the drop-down menu. You may choose “1099/W-2G File,” “21-W File,” or “W-2 file.” For our example, we will choose “W-2 File.” Once you have selected your file type, select “Next” at the bottom right corner of the page.
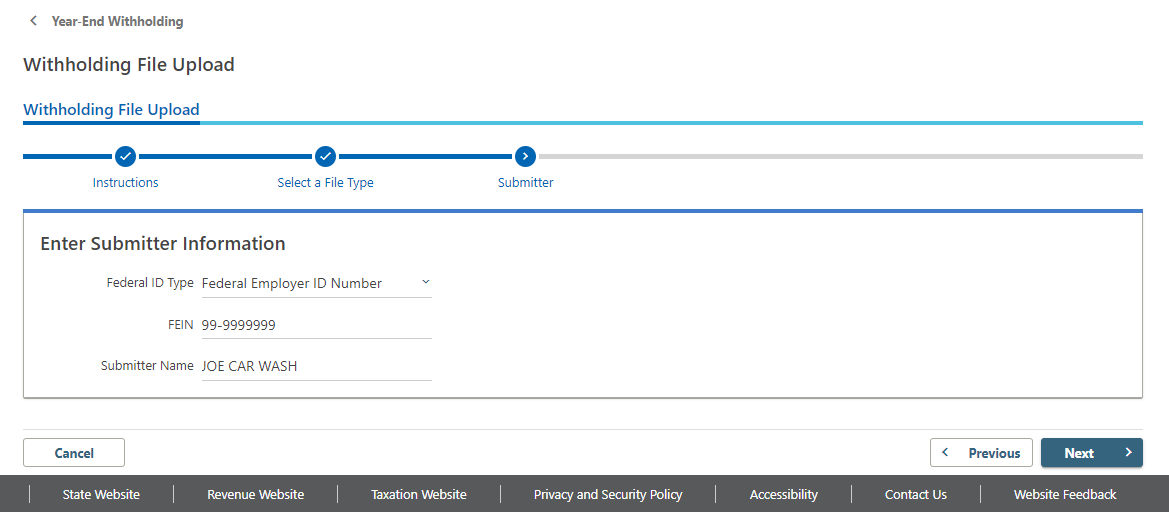
On the next page, enter the submitter information, including the FEIN (Federal Employer Identification Number), ITIN (Individual Taxpayer Identification Number) or SSN (Social Security Number) for the person or entity that has Web Submitter Access.
Once you have entered this information, select “Next” in the bottom right corner of the page.
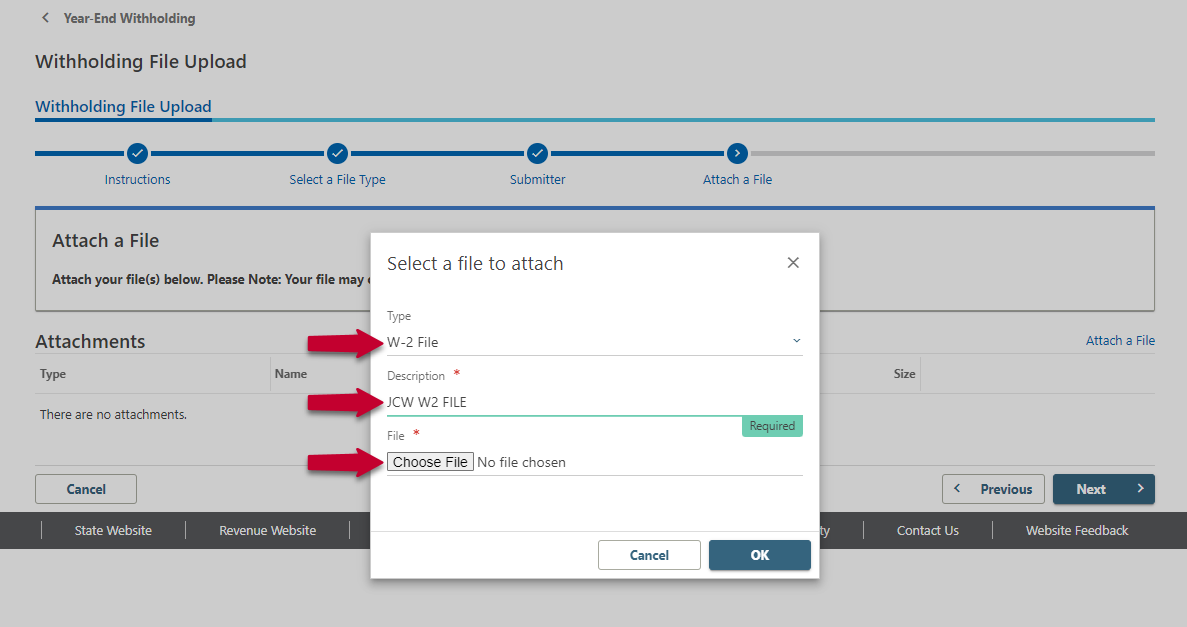
The next page will have a hyperlink to “Attach a File” on the right side of the screen, which is shown in the red box in the screenshot below. Selecting this hyperlink will open a pop-up box for attaching your file.
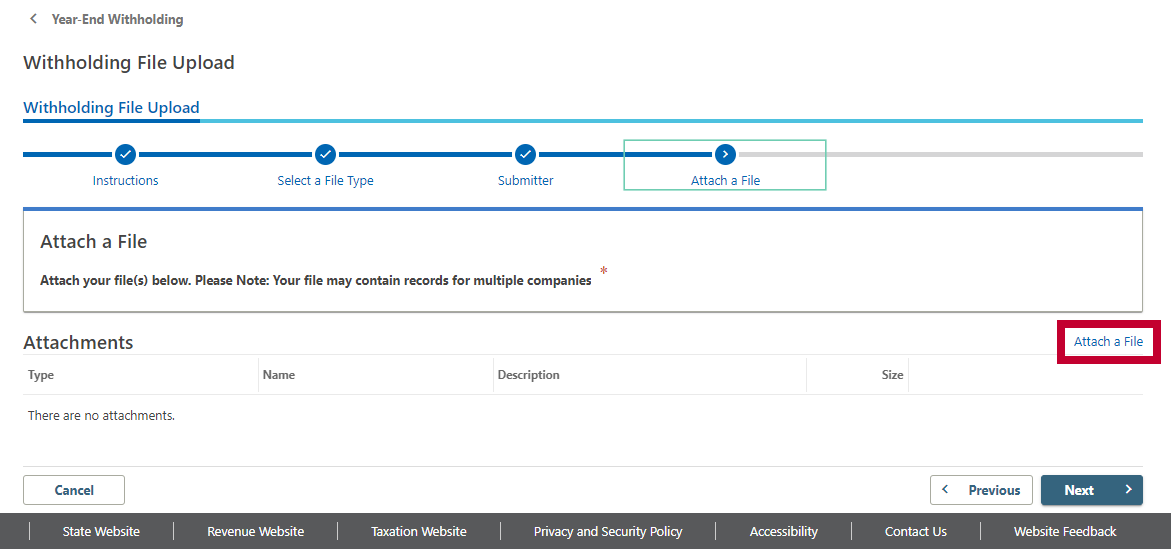
In the pop-up, select your file type, which in our example is “W-2 File.”
Enter a description of the file. We have entered “JCW W2 FILE.”
And then use the “Choose File” option under the field titled “File” to locate the file to upload on your computer.
Select “Okay” in the bottom right of the pop-up to upload your file.

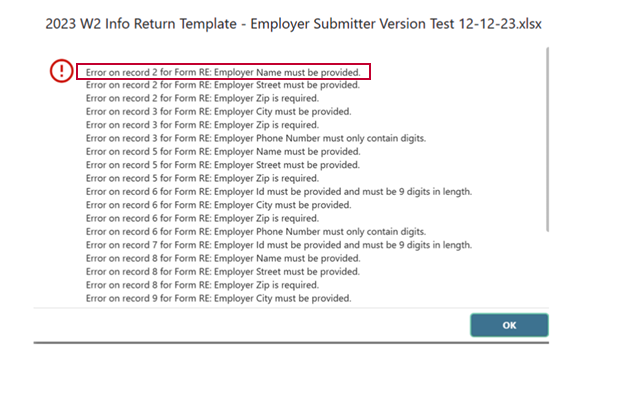
If errors are detected in the file you chose to upload, you will receive a list of the errors, their locations in the spreadsheet, and the information required to correct the error. A screenshot of errors detected on the Employer Info Tab (which will show as “Form RE” in the error list) is shown below.
The errors listed in this screenshot will need to be corrected before Revenue Online can accept the file submission. In the example shown in the red box below, the error shows the record number (“record 2”), the location of the error (“Form RE,” which is the Employer Information Tab), the column name for the error (“Employer Name”), and the correction required (“must be provided”).
The errors listed in the screenshot below provide an example of errors located on the Employee Information Tab (which will show as “Form RS”).
As in the previous example, the errors listed will need to be corrected before Revenue Online can accept the file submission. In the example shown in the red box below, the error shows the record number (“record 6”), the location of the error (“Form RS,” which is the Employee Information Tab), the column name for the error (“Employer ID”), and the correction required (“not found in Employers Info sheet”).

Once you have fixed any detected errors in your file, save your corrected file on your computer, and then select the “Attach a File” hyperlink on the “Withholding File Upload” page. (The “Attach a File” hyperlink is shown in the red box in the screenshot below.)

As before, a pop-up will appear.
In the pop-up, select your file type, which in our example is “W-2 File.”
Enter a description of the file. We have entered “JCW W2 FILE.”
And then use the “Choose File” option under the field titled “File” to select and upload the corrected file from your computer.
Select “Okay” in the bottom right of the pop-up to upload your file.
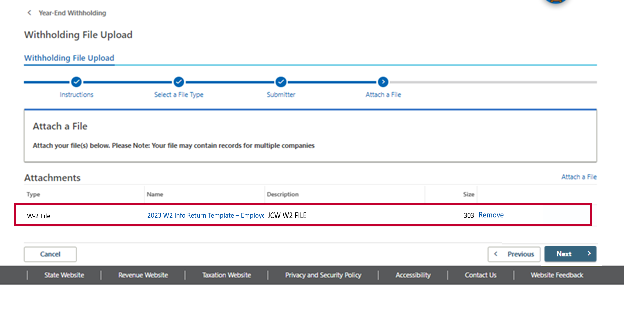
Your file will look like the image below when it is ready for final submission, and you can then select “Next” in the bottom right of the page.
You will have one last opportunity to review the information for accuracy before submitting your file to the Colorado Department of Revenue system, as shown in the image below.
When you are ready to proceed, select “Submit” in the bottom right of the page.

You will receive a Confirmation pop-up box, which is shown in the screenshot below.
Enter your email address, and then enter your email address a second time to confirm the address to receive an email confirming your submission. Select “OK” when you have entered your email address twice correctly.
Note: This confirmation email will NOT contain the filing ID needed to reference your file in the CDOR system.

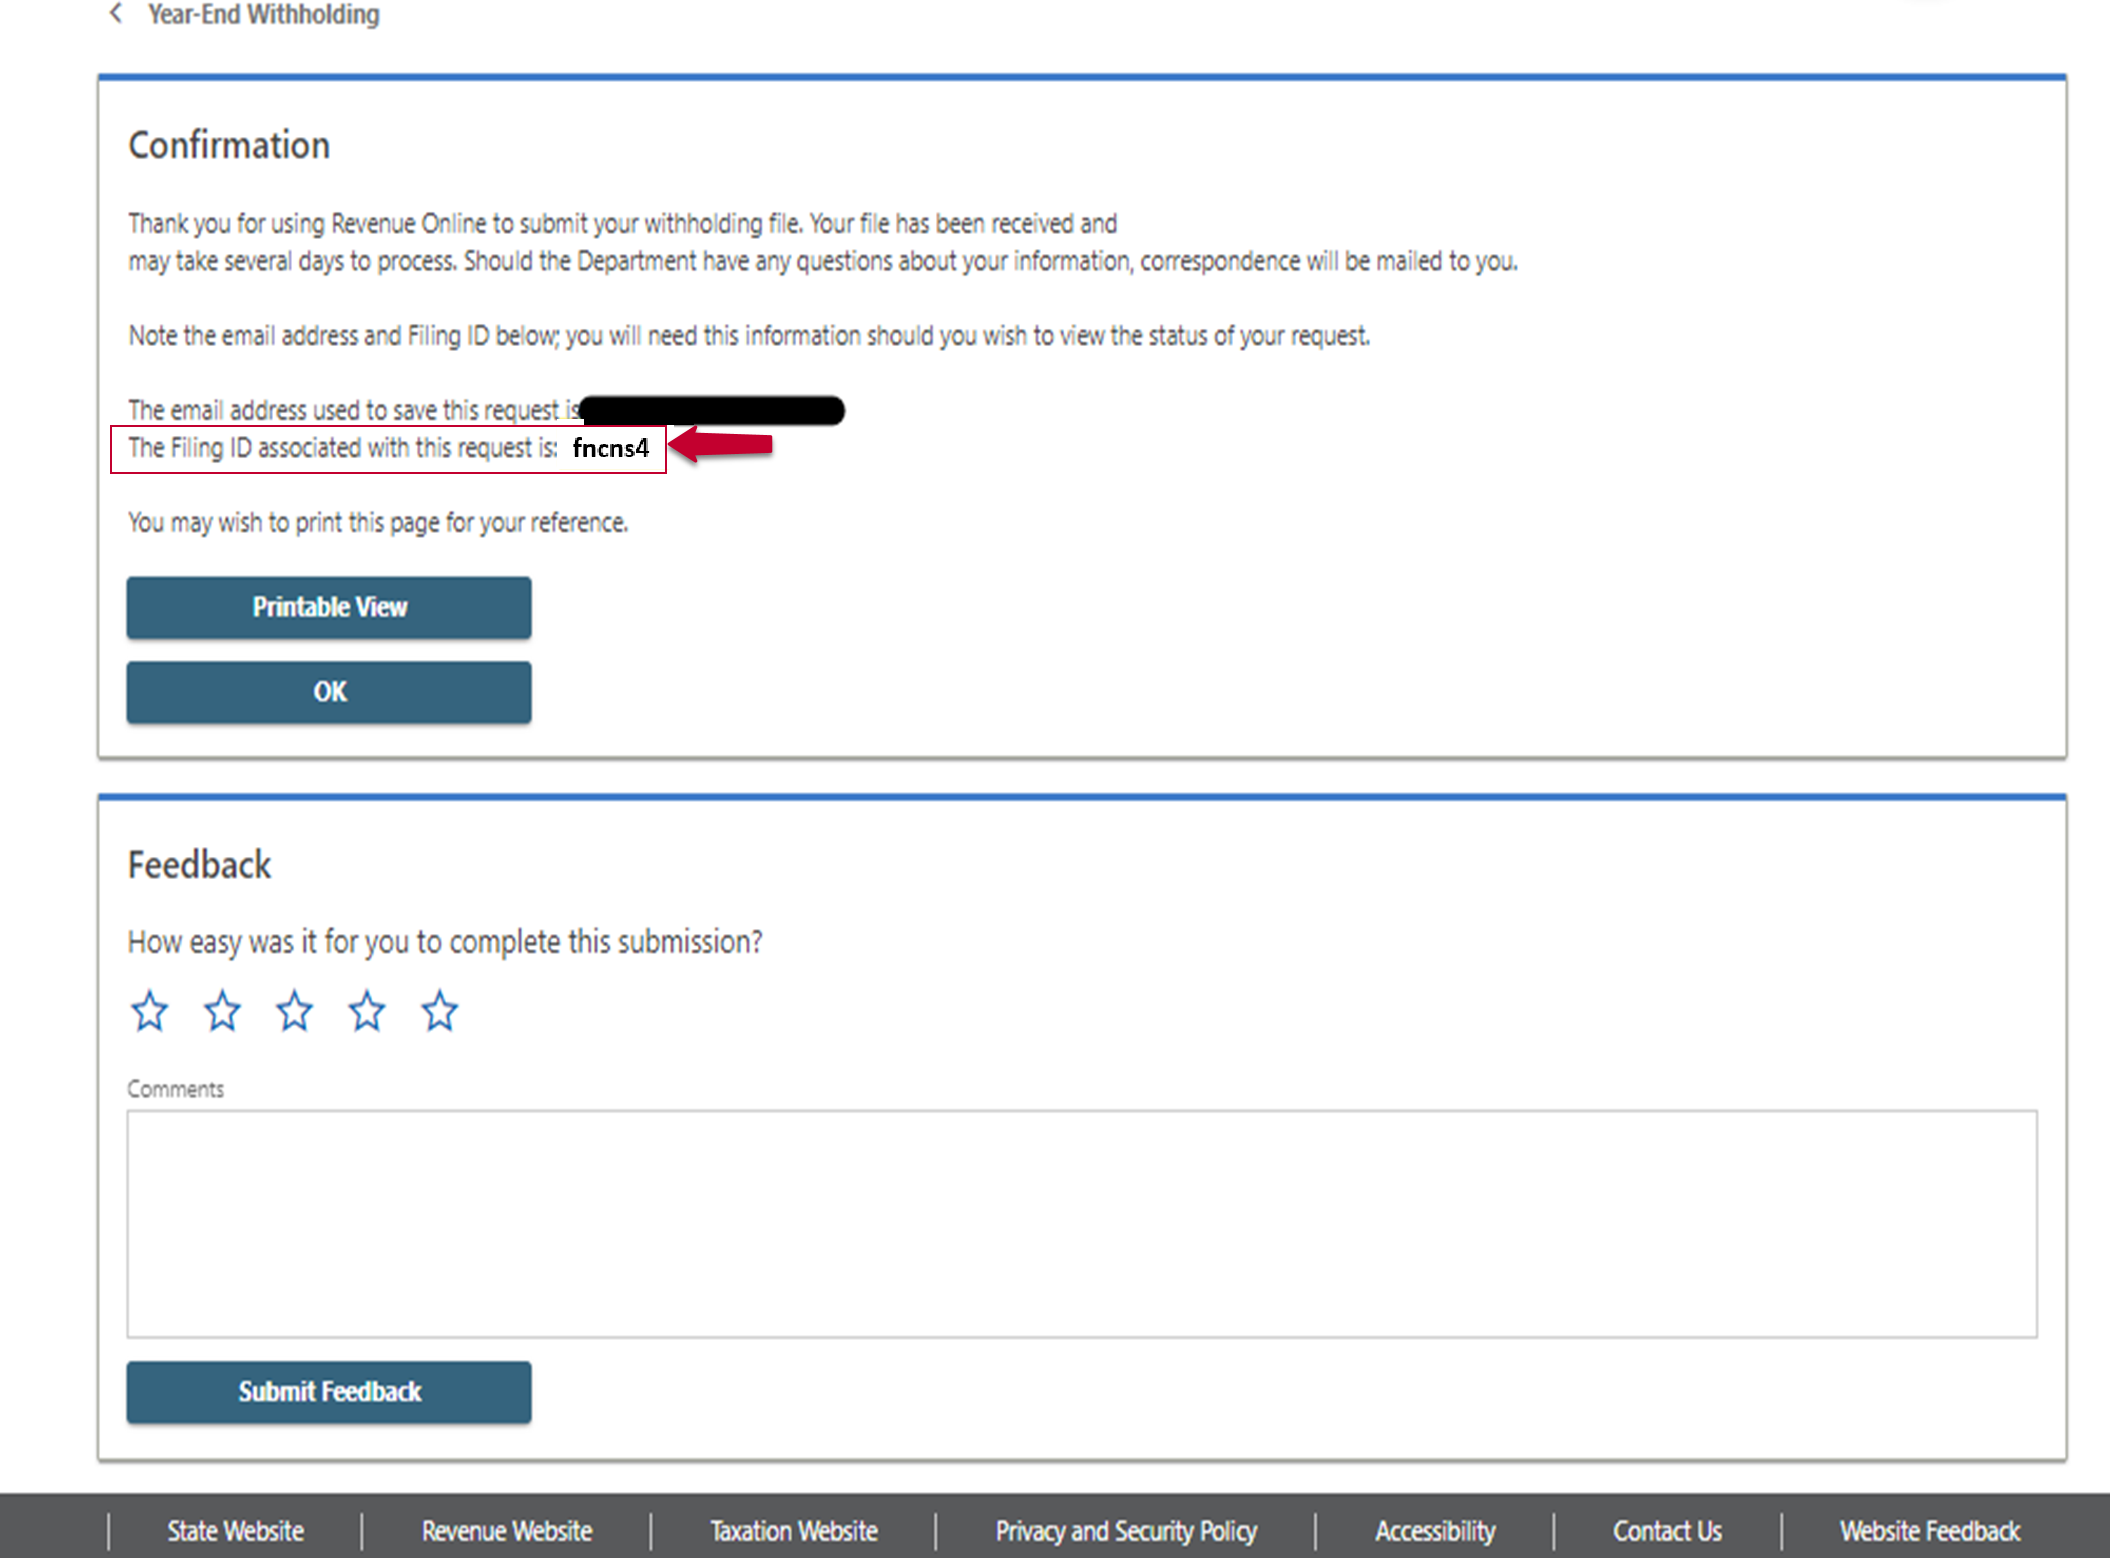
The next page will be your confirmation page, which will include the email address where the confirmation email was sent and the unique Filing ID associated with your request.
PLEASE SAVE THE FILING ID associated with your request for future reference. This Filing ID is shown with a red box and a red arrow in the example screenshot below.
NOTE: Please allow up to 5 business days for processing. Please keep your confirmation email and Filing ID in your records for any questions or concerns regarding the file. If you need to contact the Department, please be ready to supply the Filing ID and email address for your submission to be reviewed.